Spicy Garlic Hummus with Fresh Herbs and Lemon
“Spicy garlic hummus recipe ready in 10 minutes. This creamy dip features fresh herbs and lemon for a zesty flavor that elevates any appetizer spread.”
The first time I tasted Spicy Garlic Hummus with Fresh Herbs and Lemon at a friend's gathering, I was blown away. The creaminess combined with the zing of fresh herbs and that punch of garlic made me realize how much store-bought hummus was missing.
This recipe is all about bringing that vibrant flavor to your kitchen, using simple, fresh ingredients that you probably already have on hand. It’s the perfect dip for any occasion, enhancing your snacks or appetizers with its bold taste and delightful aroma.
Why This Recipe Works
Ingredients
What You'll Need
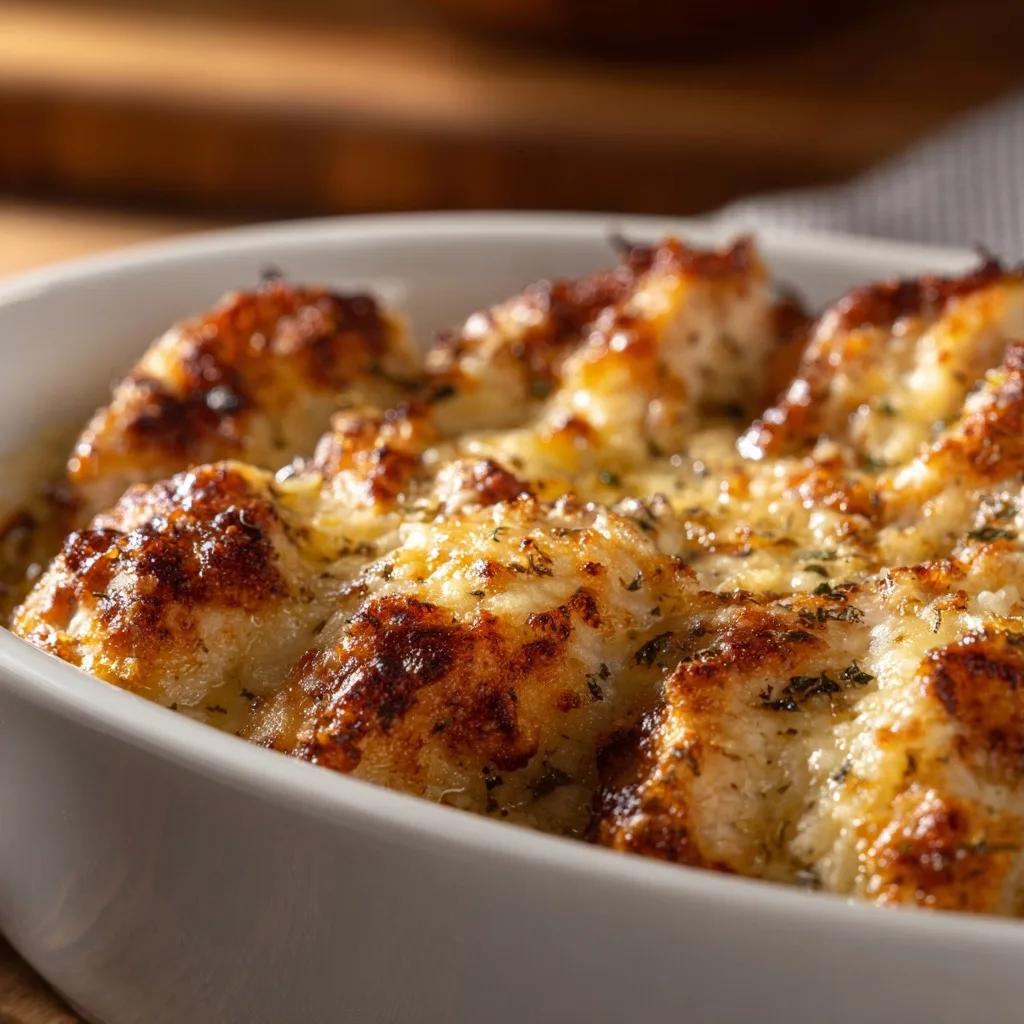
- 1 lb ground beefChoose lean beef for a healthier option or use a mix for more flavor.
- 1 cup breadcrumbsUse plain or seasoned breadcrumbs; gluten-free options work great too.
- 1 large eggThis helps bind the meatballs together; you can use a flax egg for a vegan version.
- 1/4 cup grated Parmesan cheeseAdds richness; nutritional yeast can replace it for a dairy-free alternative.
- 2 cloves garlic, mincedFresh garlic is best for flavor; garlic powder can be used in a pinch.
- 1/2 teaspoon saltAdjust to your taste; consider using sea salt for a different flavor profile.
- 1/4 teaspoon black pepperFreshly ground pepper enhances the taste; white pepper offers a milder flavor.
- 1 teaspoon dried oreganoFeel free to substitute with Italian seasoning for a different herb mix.
- 1/2 cup marinara sauceHomemade or store-bought works; just check for added sugars if you're watching your intake.
When shopping, I recommend looking for high-quality ground beef from your local butcher. For breadcrumbs, try brands that use simple ingredients, or make your own by toasting and grinding stale bread. For the marinara, I love Rao's for its rich flavor but check the label for your dietary needs.
Easy Substitutions
- Ground beef: You can swap it with ground turkey or chicken for a leaner meatball. It will change the flavor to be milder, but adding spices can enhance it.
- Breadcrumbs: Oats can replace breadcrumbs for a gluten-free version. It will give a different texture but still holds the meatball together.
- Parmesan cheese: Use pecorino Romano for a sharper taste or completely omit it for a lighter dish; the meatballs will be less rich.

How to Make This Recipe
Preparation Phase
Start by gathering all your ingredients — trust me, it makes the process smoother. Check that everything is fresh and ready to go; this also helps with the flow of flavors later on.
Preheat your oven to 375°F (190°C). As the oven warms up, you’ll start to smell the warmth and anticipation building in your kitchen; it’s the perfect time to get your baking dish ready.
Grease your baking dish with a bit of butter or cooking spray. This step ensures your dish doesn't stick, making the final reveal much easier and cleaner.
Cooking Phase
In a large mixing bowl, combine your main ingredients, mixing thoroughly until everything is well incorporated. You'll know it's ready when the mixture is uniform, and the aromas begin to mingle — so inviting!
Transfer the mixture into the prepared baking dish, spreading it out evenly. It should look smooth across the top. If it appears too thick, gently press it down with a spatula for an even bake.
Bake for 25-30 minutes at 375°F (190°C). You’ll hear a lovely bubbling sound as it cooks, and it should turn a golden brown at the edges. If it looks undercooked in the center, pop it back in for a few more minutes.
Serving Phase
Once baked, remove your dish from the oven and let it cool for about 10 minutes. This rest time allows the flavors to settle, and you’ll be able to slice it neatly. Serve warm, and enjoy every bite with friends and family!
Tips & Tricks
Prep Like a Pro
Before you start, take a moment to measure out all your ingredients. I once made the mistake of grabbing things as I went, and it turned into a chaotic scramble. Having everything prepped and ready not only speeds up the process but also helps you avoid those last-minute surprises. Trust me, it’s a great choice!
Experiment with Add-ins
Don’t be afraid to personalize your dish! I love to toss in some chopped herbs or spices to enhance the flavor. Once, I added a sprinkle of smoked paprika, and it gave the dish a pleasureful depth. Think outside the box — nuts, cheese, or even a hint of citrus zest can add that extra dimension you didn’t know you needed.
Check for Doneness
Ovens can be quirky, so keep an eye on your dish as it bakes. I’ve had a few instances where I set the timer, only to find it needed a few extra minutes. A toothpick inserted in the center is your best friend here; if it comes out clean, you’re good to go! Trust your instincts and don’t rush it.
Pro Tips
Bringing your ingredients to room temperature helps them mix more easily, resulting in a smoother texture. This is especially important for items like eggs and dairy, which blend better and create a more uniform batter.
Every oven behaves differently. To ensure even cooking, consider using an oven thermometer to check the accuracy of your temperature settings. This will help you adjust baking times and prevent over or undercooking.
After baking, allow your dish to rest for 5-10 minutes before serving. This time lets the flavors meld together and the texture set, enhancing the overall experience. Trust me, it's worth the wait!
Variations & Customizations
Flavor Twists
Garlic Herb Delight
Add 3 cloves of minced garlic and 2 tablespoons of fresh chopped parsley to the base recipe. This variation brings a robust, aromatic flavor that enhances the overall dish, making it fragrant and savory.
Spicy Kick
Incorporate 1 teaspoon of red pepper flakes and 1 tablespoon of lime juice into the mix. This twist adds a zesty heat that dances on your palate, giving the dish an exciting, fiery finish.
Seasonal Versions
Autumn Harvest
Use 1 cup of diced butternut squash and ½ cup of dried cranberries instead of the standard ingredients. The result is a warm, cozy dish with hints of sweetness and a beautiful orange hue, perfect for fall gatherings.
Summer Fresh
Replace 1 cup of the main ingredient with 1 cup of diced fresh tomatoes and ½ cup of corn. This version is light and refreshing, full of vibrant colors and a sweet, juicy flavor that screams summer.
Kid-Friendly
Cheesy Goodness
Add 1 cup of shredded cheddar cheese and ½ cup of cream cheese to the original recipe. It creates a creamy, cheesy texture that kids adore, making it a hit at the dinner table.
Fun Shapes
Use cookie cutters to shape the dish into fun forms for a playful twist. Kids love anything that looks fun, and this variation makes mealtime exciting while still tasting delicious!
Storage & Meal Prep
How to Store
Room Temperature
For short-term storage, keep your dish at room temperature for no more than two hours. If left out longer, it can become a breeding ground for bacteria, which is definitely not what we want!
Refrigerator
In the fridge, your meal can stay fresh for about 3 to 4 days. Make sure to use an airtight container to prevent moisture loss and keep flavors intact. If you’re prepping ahead, let it cool completely before sealing it up.
Freezer
You can freeze your dish for up to three months. The best way to do this is to portion it into freezer-safe containers or bags, squeezing out as much air as possible. When you’re ready to enjoy it, thaw it overnight in the fridge or use the defrost setting on your microwave.
Meal Prep
I love to batch cook on Sundays, prepping enough to last throughout the week. Use clear, stackable containers for easy storage and reheating. When ready to eat, simply pop it in the microwave for about 2-3 minutes or until heated through, ensuring it reaches an internal temperature of 165°F.
Equipment You'll Need
Essential
High-Speed Blender
A high-speed blender gives you smooth results in about 30 seconds, perfect for creating creamy sauces or purees. If you have a regular blender, it will work too, but expect to spend 60-90 seconds blending and you might need to stop to scrape down the sides.
Non-Stick Skillet
This is essential for getting that beautiful golden crust without the food sticking. A cast iron skillet can also work wonders, but it requires more oil and a little more attention to prevent sticking.
Nice to Have
Food Processor
A food processor can chop and mix ingredients quickly, saving you some prep time. However, it won't give you the same smooth texture as a high-speed blender for sauces or soups.
Frequently Asked Questions
Can I make Spicy Garlic Hummus ahead of time?
Absolutely! You can prepare Spicy Garlic Hummus up to three days in advance. Just store it in an airtight container in the fridge to keep it fresh.
Why did my hummus come out too thick?
If your hummus is too thick, it likely needs more liquid. Adding a bit of water or olive oil while blending can help achieve the desired creamy texture.
What can I serve with Spicy Garlic Hummus?
Spicy Garlic Hummus pairs wonderfully with pita bread, fresh vegetables, or even as a spread on sandwiches. It’s also great for dipping chips or crackers!
How long can I store leftovers?
Leftover hummus can be stored for up to one week in the refrigerator. Just be sure to keep it in a tightly sealed container to maintain its freshness.
Can I freeze Spicy Garlic Hummus?
Yes, you can freeze hummus! Portion it into smaller containers, and it will last up to three months in the freezer. Just thaw it in the fridge before serving.
This recipe is a true crowd-pleaser, perfect for cozy gatherings or a special family meal. For an extra touch, consider garnishing with fresh herbs to brighten up the dish.
Give it a try, and I’d love to hear how yours turns out! Feel free to comment, share your thoughts, or pin it for later!

Spicy Garlic Hummus with Fresh Herbs and Lemon
A flavorful and creamy spicy garlic hummus that's perfect for dipping or spreading.
checklist Ingredients
- 1 lb ground beef
- 1 cup breadcrumbs
- 1 large egg
- 1/4 cup grated Parmesan cheese
- 2 cloves garlic, minced
- 1/2 teaspoon salt
- 1/4 teaspoon black pepper
- 1 teaspoon dried oregano
- 1/2 cup marinara sauce
- 1 lb ground beef
- 1 cup breadcrumbs
- 1/4 cup grated Parmesan cheese
menu_book Instructions
- 1
Start by gathering all your ingredients — trust me, it makes the process smoother.
- 2
Preheat your oven to 375°F (190°C).
- 3
Grease your baking dish with a bit of butter or cooking spray.
- 4
In a large bowl, combine ground beef, breadcrumbs, egg, Parmesan cheese, minced garlic, salt, pepper, and oregano.
- 5
Form the mixture into meatballs and place them in the greased baking dish.
- 6
Pour marinara sauce over the meatballs.
- 7
Bake in the preheated oven for 25-30 minutes, or until the meatballs are cooked through.
- 8
Allow the meatballs to rest for 10 minutes before serving.
monitoring Nutrition Facts (per serving)
Ratings & Reviews
Be the first to rate this recipe!