Savory Spinach Artichoke Dip for Your Next Gathering
“Try this savory spinach artichoke dip recipe, ready in just 30 minutes, perfect for appetizers at any gathering. A crowd-pleaser everyone will love!”
I remember the first time I tasted savory spinach artichoke dip at a friend’s gathering, and I was hooked immediately. The creamy texture combined with the earthy flavors of spinach and artichokes made it disappear faster than anything else on the table!
This recipe not only captures that comforting essence but also adds a little twist with a hint of garlic and a touch of cheese for extra richness. Trust me, it’s a crowd-pleaser that you’ll want to keep on repeat for every occasion.
Why This Recipe Works
Ingredients
What You'll Need
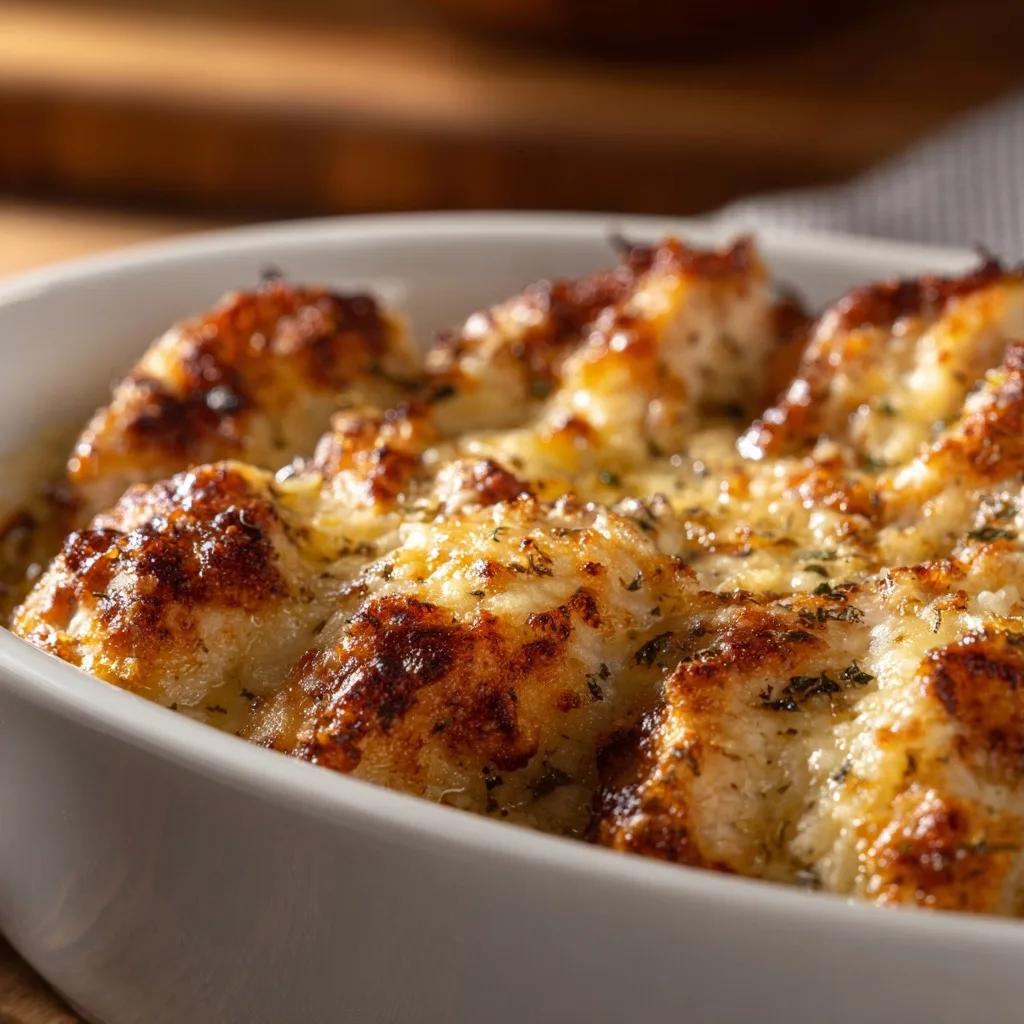
- 1 pound ground beefUse lean ground beef for a healthier option, or go for a mix of beef and pork for added flavor.
- ½ cup breadcrumbsOpt for plain breadcrumbs or panko for a lighter texture—both work well.
- 1 large eggThis helps bind the meatballs together; you can substitute with a flax egg for a vegan alternative.
- ½ cup grated Parmesan cheeseFreshly grated cheese gives the best flavor, but you can use nutritional yeast for a dairy-free option.
- 2 cloves garlic, mincedFresh garlic adds a wonderful aroma; garlic powder can be used in a pinch.
- 1 teaspoon saltAdjust based on your taste and dietary needs; kosher salt is my go-to for seasoning.
- ½ teaspoon black pepperFreshly cracked pepper enhances the flavor; white pepper can be a milder alternative.
- 1 teaspoon dried oreganoThis herb provides a lovely depth; feel free to substitute with Italian seasoning.
- 1 teaspoon dried basilFresh basil can be used if you have it on hand, just double the amount.
When shopping, I recommend looking for high-quality ground meat from a butcher or a trusted brand. Fresh herbs can enhance the dish, so grab them if they're available. And don’t forget to check your pantry for those spices!
Easy Substitutions
- Ground turkey: This is a leaner option that will make the meatballs lighter. They may be less juicy, so consider adding a little olive oil.
- Gluten-free breadcrumbs: Use crushed gluten-free crackers or oats instead. The texture will be a bit different, but they will still bind well.

How to Make This Recipe
Preparation Phase
Start by gathering all your ingredients on the countertop. It helps to have everything within reach, so you’re not scrambling later on. Plus, the vibrant colors of fresh veggies and spices are so inviting!
Next, chop your vegetables into uniform pieces. I like to aim for bite-sized chunks. This not only ensures even cooking but also makes every bite visually appealing. The crunch of fresh veggies is music to my ears.
Now, preheat your oven to 375°F (190°C). This step is crucial as it prepares your oven for even cooking. You’ll know it’s ready when you hear that satisfying whoosh of hot air as it comes to temperature.
Cooking Phase
In a large mixing bowl, combine your chopped vegetables with olive oil, salt, and pepper. Toss them well until they’re evenly coated. The aroma of olive oil mingling with fresh veggies is wonderful. It should smell fresh and vibrant!
Spread the vegetable mixture onto a baking sheet in a single layer. This allows them to roast evenly, getting that lovely caramelization. If they’re overcrowded, they’ll steam instead of roast. Nobody wants that!
Roast the vegetables in the preheated oven for about 25-30 minutes. Halfway through, give them a good stir to ensure they brown evenly. You’ll know they’re ready when they’re tender and slightly charred, releasing a sweet, nutty aroma.
Serving Phase
Once the veggies are done, remove them from the oven and let them cool for a few minutes. Serve them warm, either as a side dish or mixed into salads or grain bowls. The vibrant colors and enticing smell will surely impress!
Tips & Tricks
Uniform Vegetable Chopping
When you chop your veggies, aim for uniform pieces. This ensures they cook evenly, so you don’t end up with some crunchy and some mushy bits. I once made the mistake of tossing in a big chunk of carrot with smaller bell pepper pieces, and the difference in texture was frustrating. A simple tip is to use a ruler to measure your cuts—1-inch pieces tend to roast beautifully.
Experiment with Herbs and Spices
Don’t be afraid to mix things up with different herbs and spices! I love adding a sprinkle of smoked paprika or a handful of fresh thyme to my roasted veggies. It’s amazing how a little extra flavor can enhance the dish. I’ve had success switching out garlic powder for curry powder, which adds a whole new dimension without much extra effort.
Batch Roasting for Easy Meals
Consider roasting a larger batch of vegetables to have on hand for the week. I like to fill my baking sheet to the brim—more veggies mean more meals! I often use leftovers in salads, wraps, or even as a topping for grain bowls. It saves so much time and effort on busy days when I can just grab a handful of roasted goodness!
Pro Tips
For perfect roasting, ensure your oven is fully preheated. A hot oven helps to caramelize the sugars in your vegetables, giving them that beautiful golden-brown color and enhancing their natural sweetness. Don't skip this step!
The type of oil you use can greatly influence the flavor of your roasted veggies. While olive oil is a classic choice, grapeseed or avocado oil can withstand higher heat and add a different depth of flavor. Experiment to find your favorite!
For even cooking, give your veggies some breathing room. Overcrowding the baking sheet can trap steam, preventing them from roasting properly. Use two sheets if necessary to keep them in a single layer.
Variations & Customizations
Flavor Twists
Spicy Southwest Kick
For a zesty twist, add 1 teaspoon of smoked paprika, 1/2 teaspoon cayenne pepper, and 1/2 cup of diced jalapeños. This variation gives a smoky, spicy flavor that adds depth and warmth, perfect for those who love a little heat in their dishes.
Lemon Herb Freshness
Incorporate the zest of 1 lemon and 2 tablespoons of fresh chopped parsley and basil. This brightens up the dish with a refreshing citrus note and herbal aroma, making it perfect for a light summer meal.
Seasonal Versions
Autumn Harvest
Add 1 cup of roasted butternut squash and 1/2 teaspoon of ground cinnamon. This version brings a cozy, autumnal flavor and a lovely golden color, making it a warming choice as the weather cools down.
Spring Veggie Medley
Mix in 1 cup of blanched asparagus and 1/2 cup of sweet peas. This variation showcases vibrant green hues and a fresh, crisp texture, creating a pleasureful spring dish full of seasonal goodness.
Kid-Friendly
Cheesy Veggie Delight
Stir in 1 cup of shredded cheddar cheese and 1/2 cup of finely chopped broccoli. This cheesy version makes it more appealing to kids, adding a creamy texture and a delicious cheesy flavor that even picky eaters will enjoy.
Storage & Meal Prep
How to Store
Room Temperature
If you keep it at room temperature, it’s best to enjoy it within a couple of hours. Storing it too long can lead to spoilage, especially if it contains perishable ingredients.
Refrigerator
In the fridge, you can safely store it for up to three days. Make sure to place it in an airtight container to keep it fresh and prevent any strange odors from sneaking in.
Freezer
If you want to save some for later, it can go in the freezer for up to three months. Just be sure to use a freezer-safe container, and when you're ready to eat, thaw it in the fridge overnight before reheating.
Meal Prep
When I do meal prep, I like to batch cook enough for the week. I usually prepare it on Sundays and store it in glass containers, which are great for reheating. To reheat, pop it in the microwave for about 2-3 minutes at medium power, or heat it on the stove until warmed through. This way, you’ve got a delicious homemade meal ready to go!
Equipment You'll Need
Essential
High-Speed Blender
A high-speed blender gives you silky smooth results in about 30 seconds. If you're aiming for a creamy texture, this is my go-to. A regular blender will work, but it might take 60-90 seconds and require more scraping down the sides, which can be a hassle.
Quality Chef's Knife
A sharp chef's knife is crucial for precise chopping and slicing. It makes prep work quicker and safer. A dull knife can lead to uneven cuts, altering the cooking time and texture of your ingredients.
Nice to Have
Food Processor
A food processor can speed up the chopping process and can be particularly handy for making large batches. However, it may not provide the same finely blended consistency as a high-speed blender, especially for smooth sauces or soups.
Frequently Asked Questions
Can I use frozen spinach for spinach artichoke dip?
Yes, you can use frozen spinach, but make sure to thaw and drain it well to remove excess moisture. This prevents the dip from becoming watery.
How can I make my spinach artichoke dip spicier?
To add some heat, consider mixing in diced jalapeños or a few dashes of hot sauce. You can also use pepper jack cheese instead of regular cheese for an extra kick.
Why did my spinach artichoke dip turn out too thick?
A thick dip might be due to using too much cheese or not enough cream. To fix it, simply stir in a little extra cream or sour cream until you reach your desired consistency.
What can I serve with spinach artichoke dip?
Veggies like carrots, celery, and bell peppers are great dippers, as well as tortilla chips or toasted baguette slices. You can also serve it with crackers for a crunchy option.
How long can I store leftover spinach artichoke dip?
Leftover dip can be stored in an airtight container in the fridge for up to 3 days. Just reheat it in the oven or microwave before serving again for the best flavor and texture.
This recipe is worth making because it captures the essence of comfort food while being easy enough for any busy weeknight. Remember to let the flavors meld for a bit before serving for that extra depth. I’d love to hear your thoughts, so try it out, comment below, and share your experience!

Savory Spinach Artichoke Dip for Your Next Gathering
A delicious and creamy spinach artichoke dip perfect for parties and gatherings.
checklist Ingredients
- 1 pound ground beef
- 0.5 cup breadcrumbs
- 1 large egg
- 0.5 cup grated Parmesan cheese
- 2 cloves garlic, minced
- 1 teaspoon salt
- 0.5 teaspoon black pepper
- 1 teaspoon dried oregano
- 1 teaspoon dried basil
- 1 pound ground turkey
- 0.5 cup gluten-free breadcrumbs
menu_book Instructions
- 1
Gather all your ingredients on the countertop.
- 2
Chop your vegetables into uniform pieces.
- 3
Preheat your oven to 375°F (190°C).
- 4
In a large bowl, mix together the ground beef, breadcrumbs, egg, Parmesan cheese, minced garlic, salt, black pepper, oregano, and basil until well combined.
- 5
Form the mixture into meatballs, about 1 inch in diameter.
- 6
Place the meatballs on a baking sheet lined with parchment paper.
- 7
Bake in the preheated oven for 25-30 minutes, or until cooked through and golden brown.
- 8
Remove from the oven and let cool for a few minutes before serving.
- 9
Serve warm with your choice of dipping sauce.
monitoring Nutrition Facts (per serving)
Ratings & Reviews
Be the first to rate this recipe!